EGG TEMPERA
The term “Tempera” can refer to any water based paining media. Plant gums, glues, egg yolk, egg white glair are all “temperas”. The term derives from the Old English “temprian”; to bring something into required conditionby mixing it with something else.
Egg Tempera is a specific tempera paint made with egg yolk as the binder. Yolk is a natural emulsion of oil and water. Egg tempera paint dries first by evaporation of the water and then by the “drying” of the oil. The resulting painting has a soft sheen from the egg oil coupled a crisp linear quality typical of water thinned media.
While associated with the structured, systematic techniques of Byzantine Icon painters and the Italian
Masters of the Trecento egg tempera can be used freely and spontaneously if desired. It should not however beapplied in thick imopsoto brush work. It dries very quickly and should be built up in multiple layers.
MATERIALS
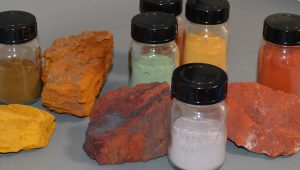
PIGMENTS
Dry ground artist’s pigments. Most artists pigments may be used in the tempera technique.
Historic palette included:
1. Lead white
2. Charcoal blacks
3. Earth pigments
4. Lead tin Yellow
5. Vermilion
6. Lapis (natural mineral)
7. Azurite
8. Malachite
9. Minium
10. Lake colors
A very basic modern palette may include:
1. Titanium white
2. Ivory black
3. Yellow ochre
4. Raw umber
5. Chrome oxide green
6. Blue, Cobalt or Ultramarine (Ultramarine is less expensive, it does not mix well by itself
with water. Ox gall liquid or other wetting agent will assist here.
7. Cadmium pigments red, yellow, orange
PIGMENTS MAY BE HAZARDOUS, USE PROPER PRECAUTIONS. Follow handling instructions
given by suppliers. Safe pigment substitutes are available for dangerous traditional
pigments from many suppliers.
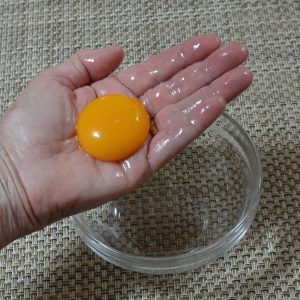
EGGS
PALETTES
Water color type palette, or little cups or jars
BRUSHES
typically those used in watercolor are preferred; size depends on technique, scale and image
WATER
DRAWING INK
PANELS
Traditional gessoed wood panels are the preferred support for tempera paint. The paint is brittle and not suited to fabric supports.
MAKING EGG TEMPERA PAINT
Pigment + Binder = Paint
1 part pigment paste + 1 part yolk = egg tempera paint
PIGMENT PASTE
1. Dry ground pigments should be mixed with water to form a paste prior to use in recipes
for water based paint.
2. The various pigments have different sized particles with different
absorption rates making measuring for paint making difficult.
3. By pre-wetting the pigments this problem is circumvented and paint making is made simple.
4. Add water a little at a time and mix or grimd the pigment with it to form
a paste with the consistancy of tube oil paint. Pigment paste looks like paint.
It is not paint; there is no binder.
5. Pigment paste may be kept indefinitely in air tight containers. Premixing pigment paste and
storing for use as needed facilitates the paint making process making it cleaner and faster
each time.
PAINT
1. Separate yolk from white of egg, drain contents from yolk sack, this will be the “binder
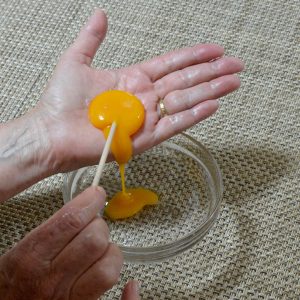
2. Mix pigment paste with equal part yolk for each color.
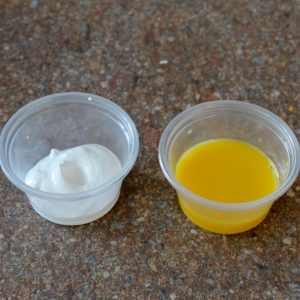
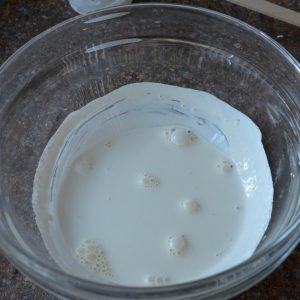
White pigment paste and yolk White pigment paste and yolk combined
This is the egg tempera pint. It will be thin and should flow freely from the brush. Some recipes call for addition of water to the yolk. This is fine the water is going to evaporate out as the paint dries. Some colors may require a little more or a little less yolk, adjust as needed. The paint should be liquid and flow in a smooth clean stroke from a brush.
ABOUT TEMPERA PAINT
1. Tempera thins and cleans up with water.
2. Tempera dries immediately on the panel surface, you can paint layer on layer without waiting. It will dry up in the palette as well so it is a good idea to cover it with a damp cloth or paper towel.
3. Paint should be prepared fresh for use, though it can be refrigerated for a day or two it will spoil.
4. Tempera can be built up as thickly as you like if this is done in many thin layers. Do not apply thick layers which will dry on the surface but remain wet inside as they may spoil.
5. Tempera is not flexible so it is best used on panel, or rigid support, as opposed to cloth supports.
GESSOED PANELS
GESSO
MATERIALS
Filler: Natural artists grade chalk, Whiting or gypsum
Rabbitskin or other hide glue
Wood panel
RABBIT-SKIN OR HIDE GLUE:
For glue of average strength
1. Soak 1 part dry glue over night in 12 – 16 parts water.
The glue will absorb the water and expand a great deal.
2. Warm the soaked and softened glue in the original container, do not add or remove water.
3. It is best to heat the glue container over warm water as in a double boiler rather than applying direct heat.
Never boil glue.
GESSO
1 part warm, prepared rabbit-skin glue of average strength
1 to 1 1/2 parts filler
Directions:
1. Slowly sprinkle filler of choice (artist grade chalk or gypsum) into warmed glue.
2. Allow the filler to sink in on its own. Do not throw it in all at once.
3. Add enough filler to saturate the glue.
4. VERY, VERY slowly and carefully blend them together. Slip a round brush into the mixture
and gently/ slowly move in one dirction around the container.You do not want to get air into
the mix or you will have bubbles and therefore holes in your finished surface.
5. Strain into clean container.
6. Use right away or allow to sit, it will gel. Re-heat by placing over warm water.
DO NOT KEEP HEATING IT, YOU WILL GET BUBBLES.
Gesso can be kept a few days in the refrigerator.
TECHNIQUE FOR GESSOING A PANEL:
1. Clean panel
2. “Sizeing” the panel
First coat: Apply size coat, diluted hide glue, to panel with brush, allow to dry.
Second coat: apply thin layer of standard glue, dry over night or longer.
3. Gessoing the panel
First coat: Apply thin layer of prepared gesso to dry sized panel in small patches using tips to rub in quickly in circular motion. This will look messy, don’t worry about it. If the
gesso starts to get tacky leave it and move on.
4. First real coat. Apply like house paint with brush running all strokes in one direction.
5. Second coat, when previous coat looses it bright shine repeat step 4 in opposite direction.
6. Continue alternating directions, apply 4 to 6 layers.
7. Dry over night
8. Sand smooth